
In this guide, we will show you exactly how to check what your file will look like at the final print size. Our #1 priority is to make sure everyone that orders from Vivid Metal Prints is happy. One of the ways we can ensure this is by maintaining realistic expectations on how large a certain file can be printed. We will be using Adobe Photoshop, but for most other editors the information in this guide is interchangeable as many image editing terms are similar.
Step 1: Sizing Your Image.
To start, we have to figure out our baseline, right? So, let’s begin by clicking Image across the tool-bar up on top. If you are using another program, you should still just look for an option called Image Size that will bring up exactly what size the image you are working on is.

When you click on Image Size it will bring up the current configurations for your image file.

Be sure to familiarize yourself with this screen. It is extremely important. When changing sizes here, we prefer to uncheck Resample Image as it will display a more true-to-life PPI count. If you leave Resample Image checked, then the editing program will allow you to enter whatever number you want into this field. This sounds great in theory, but simply typing 300 PPI into this field will not transform this low-PPI file we are working with.
We link to another article at the bottom of this one that explains the importance of retaining maximum data when shooting/editing.
Step 2: Your On-Screen Ruler Is Extremely Important.
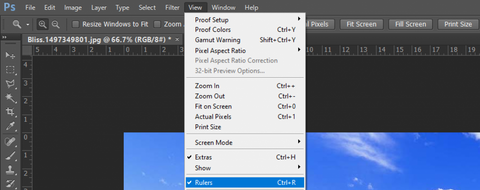
Now that we have the file sized to the desired dimensions, it’s time to see what it looks like at size. This begins by enabling the ruler in whatever photo editing program you are using. In this case, you have to go to the top bar and click on View, then click on Rulers as seen here:
Once you enable the ruler across the top of the page you have to ensure that it is set to inches (or whatever measurement you prefer to use based on your location). This is done by right-clicking on the actual ruler and selecting your desired option.

Now once you have enabled your ruler and set it to whatever you prefer to use, it is time to pull out an actual physical ruler (or measuring tape, or anything that can represent one inch physically).
Step 3: The Actual Measuring Portion.
So as you will see below, sometimes setting the output size on the image to 100% (bottom left corner in Photoshop) does not mean you are viewing the image at actual output size.
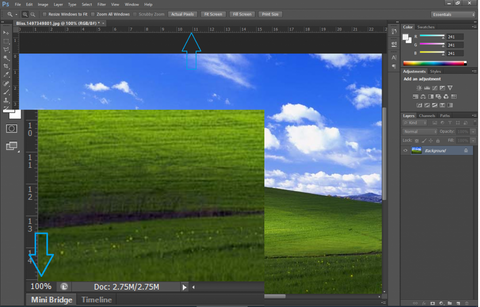
The easy way for us to tell is that we are working on a 17″ monitor for this project, and yet we can see 23″ across the top in our ruler – clearly, this is not possible if the inches are true to life.
Remember the physical ruler we mentioned for you to grab? Hold it up to the screen and zoom in/out until 1″ on the digital ruler matches 1″ on the real ruler. You can do this by using the magnifying glass or by manually typing in the percentage you want it increased/decreased in the bottom left corner (pictured above). Even though it says 100%, based on your monitor resolution it is not necessarily accurate, so just make sure your rulers match.

Step 4. Evaluate!
Now that we are done scaling the image, and we have set the digital ruler to match our physical ruler it’s time to take a look.
How did our file end up looking in the end? Let’s take a look:

So this particular image fell apart. In this case, if we were ordering this image we may choose to pass on this file or opt to do it at a smaller size. That being said, there are many options when it comes to file processing in order to get more out of images. We have software internally that can extract more details as well as retaining them, but it works better the more data the file contains.
Pictured below is what happens to your image if you elect to purchase our HD+ Processing option during the order process:
BEFORE / AFTER


Retaining more data comes from the shooting/editing process. Check out our other article explaining the difference between shooting RAW vs JPEG and the changes it makes by clicking HERE.
However, this does not work with every image. We don’t charge anything to look at an uploaded file and discuss it with you. So if you ever have any questions please feel free to reach out and open a dialogue with us! Part of what makes being a metal printer fun is dealing with new clients and sharing the knowledge we have in this space.
Sincerely,
Your friends at Vivid Metal Prints